CS46A Lab

Last modified

Getting Set Up

Copyright © Cay S. Horstmann, Kathleen O’Brien 2009-2014 Creative Commons License
This work is licensed under a Creative Commons Attribution-ShareAlike 4.0 International License.

In all labs except this one, you will work in pairs. For this lab, you will each work on your own computer so everyone has the software installed.

Part A - Set up your development environment

  1. In this lab you will be installing the JDK (Java Development Kit) and an IDE called BlueJ. IDE stands for Integrated Development Environment. An IDE lets you edit, compile, execute, and debug code all in one application. Bluej is a simplified IDE for beginners. It does not have all the bells and whistles needed by professionals, but it is easy to learn and easy to use. Later in your career, you will want to use a professional IDE like Eclipse or NetBeans (or both). We will use BlueJ this semester.
  2. Go to http://bluej.org/. The people at the University of Kent have combined both software applications you need into one package. Download the package appropriate for your machine and install as usual.
  3. You will create a great many files in this class. You need a file structure to keep them organized. If you just put everything directly on the desktop, you will lose files at some point. It would be most unfortunate if that happened during an exam. So let's create a usable structure now.

    Inside your documents folder, create a new folder called cs46a. (if you do not know how, ask your lab instructor)

    Inside cs46a folder, create four new folders: labs, homework, exams, and pars.

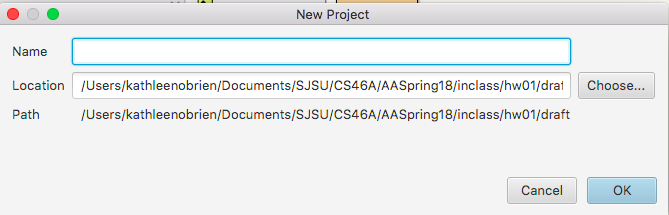
    Inside the homework folder create new folders called: hw01, hw02, and so on. Create hw01 now. You can create the others as you need them.

    Inside the labs folder, create new folders called: lab01, lab02, and so on. Create lab01 now. You can create the others as you need them.

    Your folder structure should look like this:

    documents
      cs46a
        *homework
        --hw01
        --hw02
        *labs
        --lab01
        *exams
        --exam1
        *pars
        --par01


Part B - Some modifications

Sometimes in an attempt to be helpful, operating systems set options that can cause programmers a lot of trouble. There are different problems with different platforms. Here is the fix for a Windows problem.

Windows

File names are made up of two parts: a name and a file extension. The file extension is a . (dot) followed by 2, 3, 4 letters. Examples are .docx, .txt, .java. The file extension tells the operating system what application to use to open the file. Microsoft, in its questionable wisdom, hides the file extensions by default. This can cause you a lot of grief when you need to know the extension. So lets fix that!

  1. Open the Control Panel
    1. On Windows 7, click the Start button. Type Control Panel in Search Programs and Files box
    2. On Windows 8, go to the Start Page. Click Search (the magnifying class on the right. Type Control Panel in the Search box
    3. On Windows 10, in Contara box near the start button, type Control Panel and select Control Panel Desktop App
  2. in the search box on the top right, type folder. Then select Folder Options or File Explorer Options
  3. Click the View tab
  4. In the bottom section, under Advanced Setting, uncheck the box that says "Hide extensions for known file types"
  5. Click OK

Part C - Testing your environment

  1. Start the BlueJ application
  2. To make a new project named hello in a lab1 folder do the following:
  3. To create the hello project
  4. To add a class to the project: Click on New Class button at the left. Give it a class name of HelloPrinter.

  5. Double-click on the HelloPrinter rectangle. Erase all code in the editor window and paste in this code:
    public class HelloPrinter
    {
       public static void main(String[] args)
       {
          // Display a greeting in the console window
    
          System.out.println("Hello, World!");
       }
    }

  6. Click on Compile. You should get a status message “Class compiled - no syntax errors”
  7. Click on Close.
  8. Right-click on the HelloPrinter class. Select void main(String[] args) from the menu. Click OK on the next dialog. You should get this display:

    Congratulations: Your development environment is set up and you have just executed your first Java program.

  9. Close BlueJ
  10. You will often want to open an existing project. Opening an existing BlueJ project:

Part D - Modifying a program

  1. Let's print multiple lines. Replace the program with the following:
    import java.util.Scanner;
    public class HelloPrinter
    {
       public static void main(String[] args)
       {
          // Display a greeting in the console window
          
          System.out.println("+---------------+");
          System.out.println("| Hello, World! |");
          System.out.println("+---------------+");
       }
    }

    Click Compile. Did it compile? If not, see if you can fix the error. If you can't figure out what is wrong, ask your lab instructors. That is what they are there for.

Part E. Submitting your code to Codecheck and the signed.zip file to Canvas

  1. Click Codecheck link for Lab01
  2. Copy your code and paste it to the textbox
  3. Click button CodeCheck
  4. Congratulations if it displays "pass" with "Score 1/1". Otherwise, edit your code and try again.
  5. Click button Download
  6. To find the file that needs to be uploaded to Canvas: Locate the file /downloads/HelloPrinter.signed.zip.
  7. DO NOT OPEN THE SIGNED.ZIP FILE! It is digitally signed and our grader program will check it.
  8. To submit the signed.zip file to Canvas:
  9. Double check your signed.zip file in Canvas: the name should be HelloPrinter.signed.zip and the file size should be about 6K.

Part F. Before you leave the lab today, show your lab instructor