
This work is licensed under a Creative Commons Attribution-Noncommercial-Share Alike 3.0 United States License.
Copyright © Cay S. Horstmann 2010, 2012
This work is licensed under a Creative Commons Attribution-Noncommercial-Share Alike 3.0 United States License.
The standard Java LinkedList class has a method get(int n) that gets the nth element from a linked list. It works just like in an array list, but it is not so efficient—you must traverse n links from the head. But so what. Let's implement it.
LinkedList object and 5 Node objects with the words Mary had a little lamb, with all the references set up correctly, like in figure 3 of Chapter 16, but without a ListIterator. get(4). How do you find the first link to traverse? The next one? The next one after? When do you stop? What do you return?lab8A in Eclipse from this code. (This is just the code from Section 16.1.)
Add a dummy get method to the LinkedList class, like this:
public Object get(int n)In the unit test class
{
return null;
}
LinkedListTest, modify the setUp method to fill sampleList, and complete the unit test method testGet that calls get(3), and asserts that the result is whatever you think it should be once you implement your method correctly. What is your LinkedListTest class?
get method. Write a loop that moves a reference to the nth node and returns the data stored in that node.
Node current = ...
for (int i = ...; ...; i++) { current = ... }
return current....;
For now, assume that there are n elements in the linked list.
What is your get method?
n is < 0 or ≥ the length of the list. In those cases, your method should throw an IndexOutOfBoundsException. Write two JUnit tests for this, one with n < 0 and one with n ≥ the length of the list. You want to specify that in these cases, the exception is expected. Read through the documentation of the Test annotation to see how to do this.
What are your test cases?
n < 0 to the get method. Re-run the unit test. How do you know you are making progress?n is larger than the linked list. There is no method for getting the length, so you need to diagnose this in some other way. How?get method? add method for your LinkedList class. Start again with a dummy:
public void add(int n, Object x)
{
}
The method should add before the nth element. Call sampleList.add(4, "lazy") and asserts that the elements at positions 3, 4, and 5 are correct. (Use your get method.)
What is the code of your tester?
Node previous = ...;
Node newNode = ...;
newNode.data = x;
newNode.next = ...;
previous.next = ...;
What is the complete code?
Make a unit test method for it. What is it?
add method to deal with that special case?Run your unit tests. Did they all pass?
The LinkedList class in the src directory is a variation of the linked list class of your textbook.
src subdirectories for the source and the unit test. This is the same as Worked Example 16.1, but with a slightly simplified ListIterator.remove method. Run the unit test. What happens?remove method. Trust me—it correctly computes positionToRemove so that it points to the node to be removed.
What does the code do? Draw the figure after the instructions
 if (positionToRemove.previous != null)
    positionToRemove.previous.next = positionToRemove.next;
 if (positionToRemove.next != null)
    positionToRemove.next.previous = positionToRemove.previous;
Can you spot the mistake(s) that make the unit tests fail? If so, describe what you think is wrong or missing. If not, just say so. It's ok if you don't know yet.
iter.remove(); in the removeHead test. Click on the line number. A red square should appear, indicating the breakpoint.

Run the debugger (Debug -> Debug Test file) from the menu.
The debugger runs until the given line. It turns green to indicate the current program location.
Below, a variable table appears showing the values of this and iter. What values are shown for them?
Here we debug the unit test. That's a common thing to do when a unit test fails mysteriously. If you need to debug the main program, you select Debug -> Debug Main Project instead.
Open up this and sampleList by clicking on the triangles.
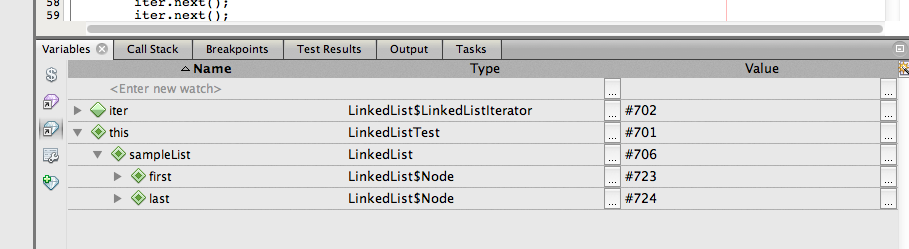
The numeric values are probably different in your program run.
What values do you get for first and last?
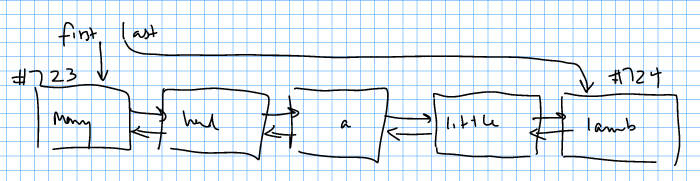
Then expand the first node of the LinkedList and the next node of each LinkedList$Node. (The $ denotes an inner class.) Fill in the remaining nodes. Keep clicking on the newly appearing next nodes until you get null.
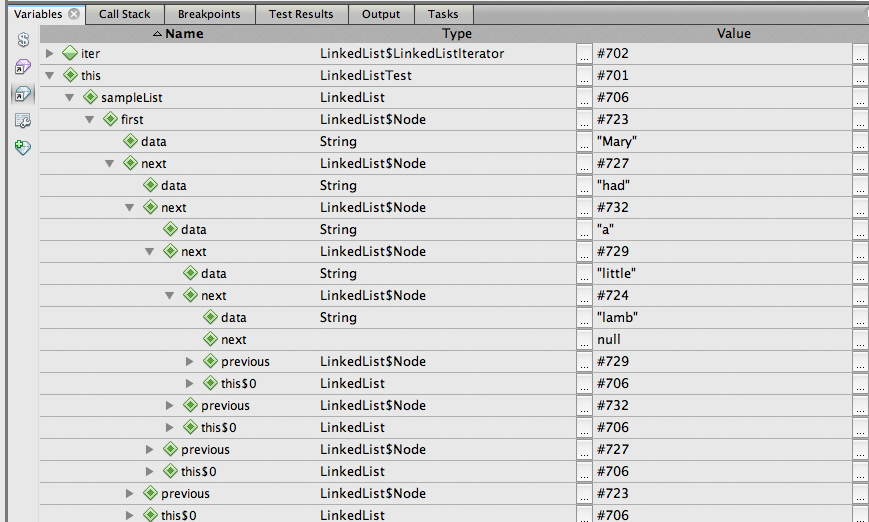
What values do you get? Label each node with the reference number.
It is impossible to debug a complex program without pencil and paper. You need to draw diagrams and jot down your observations. Keep a notebook for this purpose, just like a “wet lab” scientist keeps a lab notebook.

previous references. What values do they have? Why?first and last reference and the next and previous references of all nodes are in sync.
Next, let's check the iterator.
In the debugger, open up the iter variable. You'll see a reference position and two boolean variables that you can ignore for now.
Add a drawing of the iterator object to your sketch. Make the position reference point to the node with the correct number.
Attach the new drawing if possible, or describe in words where these references point to.
remove method, then step over each line.
Which lines get executed?
remove method and are back in the removeHead method.
Following the same procedure as before, draw another diagram that shows all links, starting with this.sampleList and iter. Label each node with its reference number. Carefully check the next and previous references. You know that some of them will be wrong because the test case is about to fail.
How does your drawing differ from the previous one?
Fix the bug. What is the code for your fix?
What happens?
We'll fix this bug in section D.
remove methodLinkedListTest class. Run the unit test one more time and note that the removeTail test fails.
Which of the two assertions is failing?
previous doesn't yield "little".
Explain why the call to previous was supposed to return "little". Where does the iterator conceptually point to after the call to remove? (Recall that iterators conceptually point between elements.) What element does it “skip over” when you call previous?
remove method.
When logging a node reference, you can just convert it to a string; this gives the hash code of the object reference. For example,
Logger.global.info("first=" + first + ",last=" + last);
Add this to the end of remove. Then log the next, previous values of all nodes:
String contents = "";
for (Node node = first; node != null; node = node.next)
   contents += "next=" + node.next + ",previous=" + node.previous + "\n";
Logger.global.info(contents);
When you use logging statements in a JUnit test class, you need to add the following statement to the constructor (or a @BeforeClass method):
Logger.global.addHandler(new StreamHandler(System.out, new SimpleFormatter()));
What output do you get when you run the unit test?
head, tailreferences.
Which references are wrong?
remove method?There is no right or wrong answer. Write down what you prefer, and why.
Is the remove method now free from bugs? That is not a question that you can answer with debugging or logging. As the famous computer scientist Edsger Dijkstra pointed out: "Program testing can be used to show the presence of bugs, but never to show their absence!"